Here are the steps along with helpful tips on how to install the GM-accessory Chrome tubular assist steps replacing the original black plastic ones:
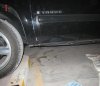
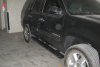
1. Start with Driver's side as it is the easier one & you will feel encouraged to finish the job – See picture-1
2. I gained better access to underside of Tahoe by driving my front tires over the parking curb stone.
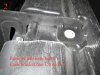
3. Start by removing the bolt holding the lower part of front fender to the original plastic step. Keep this bolt as you need to put it back on (step 5) - See picture-3
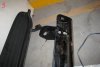
4. Proceed by removing the remaining bolts. Remember to only loosen two of them & keep them hanging till end as they will hold step from falling on your head - See picture-2
5. After the OE plastic Step is out, put the screw of the front fender back as it will not be used for fixing of new Chrome Step & it is needed to fix the lower part of fender in place.
6. Position the chrome step brackets in place of previous brackets & insert bolts.
7. The passenger side will need extra attention as GM engineers were quite oblivious about interference with Fuel Pipes
8. Remove OE step as detailed in steps above. Take extra attention not to hit the very close pipes.
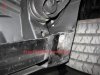
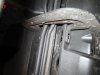
9. Do not put back the original bolt holding the front fender. This is a long bolt that was used to compensate for the thickness of the step (picture). Now that it will only hold the fender, trying to put it back on will make it touch & damage the fuel pipes. Use the bolt supplied with kit which is of same diameter but shorter. It will clear the fuel lines by a hair thickness!! - See picture-6
10. Fitting the new chrome step as it will damage the fuel lines as there is not enough space to position all 4 brackets at same time. I tried all sorts of tricks to try to tweak them into position… It is just not possible.
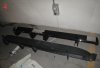
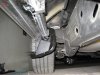
11. Solution: dismantle the 4 brackets from the chrome step by removing the 2 nuts holding each one, Install each bracket alone on the vehicle, then put the chrome step on top & tighten everything up - See picture- 7
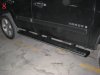
12. You are done….. It took me around 3 hours with basic garage equipment - See pictures- 8, 9
Enjoy…
1. Start with Driver's side as it is the easier one & you will feel encouraged to finish the job – See picture-1
2. I gained better access to underside of Tahoe by driving my front tires over the parking curb stone.
3. Start by removing the bolt holding the lower part of front fender to the original plastic step. Keep this bolt as you need to put it back on (step 5) - See picture-3
4. Proceed by removing the remaining bolts. Remember to only loosen two of them & keep them hanging till end as they will hold step from falling on your head - See picture-2
5. After the OE plastic Step is out, put the screw of the front fender back as it will not be used for fixing of new Chrome Step & it is needed to fix the lower part of fender in place.
6. Position the chrome step brackets in place of previous brackets & insert bolts.
7. The passenger side will need extra attention as GM engineers were quite oblivious about interference with Fuel Pipes
8. Remove OE step as detailed in steps above. Take extra attention not to hit the very close pipes.
9. Do not put back the original bolt holding the front fender. This is a long bolt that was used to compensate for the thickness of the step (picture). Now that it will only hold the fender, trying to put it back on will make it touch & damage the fuel pipes. Use the bolt supplied with kit which is of same diameter but shorter. It will clear the fuel lines by a hair thickness!! - See picture-6
10. Fitting the new chrome step as it will damage the fuel lines as there is not enough space to position all 4 brackets at same time. I tried all sorts of tricks to try to tweak them into position… It is just not possible.
11. Solution: dismantle the 4 brackets from the chrome step by removing the 2 nuts holding each one, Install each bracket alone on the vehicle, then put the chrome step on top & tighten everything up - See picture- 7
12. You are done….. It took me around 3 hours with basic garage equipment - See pictures- 8, 9
Enjoy…