Converting to HID Lights on Tahoe LT

Disclaimer: Links on this page pointing to Amazon, eBay and other sites may include affiliate code. If you click them and make a purchase, we may earn a small commission.

Fdnyfish

Full Access Member
Joined
Sep 4, 2014
Messages
73
Reaction score
0
Finished Install

Hood Open (Left HID - Right OEM)

Hood Closed (Both HID)
 

Attachments

  • IMG_2402 (Small).JPG
    IMG_2402 (Small).JPG
    61.1 KB · Views: 137
  • FD1_9354.jpg
    FD1_9354.jpg
    182.1 KB · Views: 118

mwardncsu

New Member
Joined
Feb 18, 2015
Messages
21
Reaction score
0
fdnyfish - the link is not working for me - looks like something was truncated in the paste....

I'm assuming these are for low-beam only? Not wild about the light on my LT either and planning to at least drop new halogen bulbs with a whiter color temperature (and hopefully more lumens), but kicking around retrofits - have them on my Mazda 6 and have gotten spoiled....
 

Bighurk

New Member
Joined
Feb 22, 2015
Messages
19
Reaction score
0
Location
CA
How easy is this to install? Any splicing or purely plug and play?
 

RiverRunner

Full Access Member
Joined
Mar 4, 2015
Messages
87
Reaction score
1
Location
SoCal and North West AZ
I drive across the desert, usually at night, the stock low beams are not adequate for that type of driving. My BMWs have LED headlights, that blow away my previous BMWs HID headlights. Anyone know of an LED retrofit available for the 2015 Tahoes yet?
 

KILLROY

New Member
Joined
Apr 16, 2015
Messages
4
Reaction score
0
Plug n Play? My low beams are in sealed compartments and the right one is behind the air cleaner assy. Is there a trick to this Im not aware of?
 

Bighurk

New Member
Joined
Feb 22, 2015
Messages
19
Reaction score
0
Location
CA
Plug n Play? My low beams are in sealed compartments and the right one is behind the air cleaner assy. Is there a trick to this Im not aware of?


Kilroy, you have to take the airbox out and then mount the ballasts underneath. The airbox is only held down by 3 rubber pieces. After you remove it then Plug n play. Lol


Sent from my iPhone using Tapatalk
 

KILLROY

New Member
Joined
Apr 16, 2015
Messages
4
Reaction score
0
The airbox is easy, how about drilling holes in the sealed covers so you can run the wiring. My setup you have to actually cut the headlight wires and feed them through the included grommet and solder to the included wire assy. Not my definition of plug & play.
 

Bighurk

New Member
Joined
Feb 22, 2015
Messages
19
Reaction score
0
Location
CA
Wow. Some kits, you just plug into the factory headlight wire no cutting or anything.


Also, for my kit it came with relay harness and capacitors. I plug everything in and turn on my lights but they only come on for 2 seconds and they go off. Any one else experience this? Am I wiring something incorrectly?


Sent from my iPhone using Tapatalk
 

73Vetteman

New Member
Joined
Apr 26, 2015
Messages
32
Reaction score
0
Location
Livonia, Michigan
Correct Wiring

I assume you have a single relay harness. If so, only 1 capacitor is needed.

You must FIRST plug one of the original vehicle headlight plugs into a capacitor. I found the plug on the passenger side worked best.

Then plug the mating end of the harness into the other end of the capacitor.

Note: The vehicles driver side headlight plug is no longer used so tape the end of it and wire tie or tape it where it can't bounce around or short against anything.

Your remaining two relay harness plugs connect to your ballasts.

The "battery" wire feeding the relay harness (usually red) can be connected to the unused stud on the vehicles fuse block on the passenger side. I bought an M8x1.25 nut and matching size ring terminal to attach it.

You need to find a good place to attach the "ground" lead from the harness (usually black) to the engine block or other suitable location.

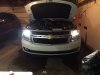
I used an H11 INNOVITED 55 watt 5,000K slimline kit on one vehicle and an OPT7 55 watt 6,000K slimline kit on another vehicle. Both kits worked very well and I was able to mount their passenger side ballast on the core support rather than under or behind the air cleaner box. Both brands appear to be quality kits and are very affordable at about $70 on Ebay.

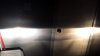
Like most brands, different color bulbs are offered but after trying two I preferred the 5,000K color for their greater light output and whiter light. The 6,000K give off a noticeably blue light. For reference O.E.M HID lights are about 4,300K. The greater light output of the 55 watt version works very well with the 2015's projector lenses due to their abrupt upper cut off so the extra light is directed downward and oncoming drivers don't get blinded.

You definitely need the optional relay harness and one capacitor to make HID's work on the 2015 vehicles. Capacitors usually come only as a pair but they are cheap. The capacitor smooths out the PWM signal and the relay supplies full power during the DRL function.

OPTIONAL: When replacing the air box, I removed the restrictive silencer that snaps into the outside of the air box to allow for better breathing. I used a 2" thick by 1" wide by about 30" long foam strip left over from a window A/C to replace the original thin foam seal from the air box to the inner fender. Two of the original 1" foam seals doubled would probably work as well. The engine now sounds more "throaty" and not too loud. Another nice improvement I think.
 
Last edited:

Bighurk

New Member
Joined
Feb 22, 2015
Messages
19
Reaction score
0
Location
CA
Thanks 73vetteman, I think when I put it in I followed the diagram that came with the hids which was horrible and I connect red the capacitor to the ballast instead of the vehicle plug like you just mentioned. I will give it a shot later on today. Thank you!


Sent from my iPhone using Tapatalk
 

rickybarra7

New Member
Joined
May 2, 2015
Messages
2
Reaction score
0
Debating

How's it going Gentlemen,

Well I was skeptical on which HID setup I wanted to install on my 2015 Tahoe LT. I was tired of looking at the OEM (yellow) look on top of the LED strip. I did lots of research on which system I wanted to install and read lots of bad reviews. I decided to go ahead and simply switch the OEM bulb for the Sylvania ZXE H11 bulb. Simply to try them out without and not having to deal with the hassle of relays, capacitors, and potential flickering. Here are some photos. Let me know your what you think? Simply looking for that Crisp White look. All for $54.

Also, wanted to add, removing that Air Intake was a little more stubborn then explained on other Forums.
 

Attachments

  • 20150511_172918.jpg
    20150511_172918.jpg
    24.4 KB · Views: 57
  • 20150511_172936.jpg
    20150511_172936.jpg
    34.1 KB · Views: 50
  • 20150511_173819.jpg
    20150511_173819.jpg
    38.8 KB · Views: 52
  • 20150511_173830.jpg
    20150511_173830.jpg
    31.5 KB · Views: 47
  • 20150511_173859.jpg
    20150511_173859.jpg
    31.2 KB · Views: 52

mwardncsu

New Member
Joined
Feb 18, 2015
Messages
21
Reaction score
0
How does the overall brightness / visibility down the road compare? Better / worse / same?
 

rickybarra7

New Member
Joined
May 2, 2015
Messages
2
Reaction score
0
No dramatic change, still nearly the same visibility. Just a clear look now.
 
Top