98_2DR
Full Access Member
- Joined
- May 23, 2013
- Messages
- 86
- Reaction score
- 1
I see this a lot on every forum I am a member of...
I have four cars a 1998 Monte Carlo, 2002 trailblazer (junk), 1998 2 dr tahoe and a 2000 Buick ultra. My wife has a 2012 accent so hers are still nice and clear, but all four of my cars had really bad fogged lights, they are ugly and dangerous! I paid a body shop to clean one at the cost of 150 bucks, I bought the restore kit from my local parts house for the cost of 20-30 bucks, and I had Walmart do it (ha ha) at the cost of 40 bucks all to last 6 months to a week, I did some research and couldn't find a good way to clean them and last or even look any different. I was at a friends house who restores vintage gi joes and he told me about this kit to polish plastic, it's a 3 part kit from the brand novus. I tried it and it worked pretty good however still was foggy so I did some searching and combined a few different techniques from different places and the results are AMAZING.
I started with a spray bottle of water to keep the lenses wet, a bowl with water, some wet/dry sandpaper with 2000, 1500, and 1000 grits, the three stage novus polish kit, 3 very soft microfiber cloths and some paper tape. Total spend was around $15-20 bucks for everything....
Started by cleaning the headlights with water and a paper towel, dried then taped all the painted areas and chrome areas that I didn't want to harm with the sandpaper, then after soaking the sandpaper in the bowl of water for a few minutes I started spraying water on the lens sanding starting with 1000 girt paper, did that for a few minutes in each side, making sure it stayed wet I kept sanding till the milky white water turned clear, then I worked down doing same thing with each grit, 1000, 1500, then 2000. After all that I took the stage 3 polish and with half of one of the cloths I buffed the lights with that per the instructions on bottle, then with the clean side of cloth I buffed clean, then again with the stage 2 bottle and then with the last step which is stage 1 it's the "sealer" I also added meguiars headlight sealer bought at Walmart. It's in a black bottle. Total time about 1 hour to an hour and a half. And the results are the lights are like new, no foggyness and I didn't have to buy new lights! I did all this by hand so I didn't ruin the lights by burning them, it's not hard at all. My 1998 Monte Carlo I did over a year ago and it's still clear as new!
So before you replace your lights save some cash and try restoring them!
I found the novus plastic polish on eBay for 11.00 for all three bottles in the 2oz size which will do several cars. The sandpaper was 2.00-3.00 for the 2000,1500,1000 kit. The meguiars sealer was like 5.00 at Walmart and the microfiber cloths I got at dollar store. Elbow grease was free. Results were priceless... I have done headlights, turn signals, and tail lights all with like new looks and still clear after about a year. Even had a scratch on my sunglasses and I used just the polish without the sandpaper of corse and it polished it right up... This stuff is great!
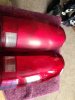
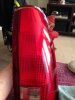
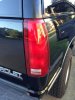
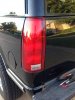
My tahoe has some really bad tail lights so I will clean them up and post before and after pics for you guys to see. Anyone can do it just do it exactly like what's above and you'll be fine.
I have four cars a 1998 Monte Carlo, 2002 trailblazer (junk), 1998 2 dr tahoe and a 2000 Buick ultra. My wife has a 2012 accent so hers are still nice and clear, but all four of my cars had really bad fogged lights, they are ugly and dangerous! I paid a body shop to clean one at the cost of 150 bucks, I bought the restore kit from my local parts house for the cost of 20-30 bucks, and I had Walmart do it (ha ha) at the cost of 40 bucks all to last 6 months to a week, I did some research and couldn't find a good way to clean them and last or even look any different. I was at a friends house who restores vintage gi joes and he told me about this kit to polish plastic, it's a 3 part kit from the brand novus. I tried it and it worked pretty good however still was foggy so I did some searching and combined a few different techniques from different places and the results are AMAZING.
I started with a spray bottle of water to keep the lenses wet, a bowl with water, some wet/dry sandpaper with 2000, 1500, and 1000 grits, the three stage novus polish kit, 3 very soft microfiber cloths and some paper tape. Total spend was around $15-20 bucks for everything....
Started by cleaning the headlights with water and a paper towel, dried then taped all the painted areas and chrome areas that I didn't want to harm with the sandpaper, then after soaking the sandpaper in the bowl of water for a few minutes I started spraying water on the lens sanding starting with 1000 girt paper, did that for a few minutes in each side, making sure it stayed wet I kept sanding till the milky white water turned clear, then I worked down doing same thing with each grit, 1000, 1500, then 2000. After all that I took the stage 3 polish and with half of one of the cloths I buffed the lights with that per the instructions on bottle, then with the clean side of cloth I buffed clean, then again with the stage 2 bottle and then with the last step which is stage 1 it's the "sealer" I also added meguiars headlight sealer bought at Walmart. It's in a black bottle. Total time about 1 hour to an hour and a half. And the results are the lights are like new, no foggyness and I didn't have to buy new lights! I did all this by hand so I didn't ruin the lights by burning them, it's not hard at all. My 1998 Monte Carlo I did over a year ago and it's still clear as new!
So before you replace your lights save some cash and try restoring them!
I found the novus plastic polish on eBay for 11.00 for all three bottles in the 2oz size which will do several cars. The sandpaper was 2.00-3.00 for the 2000,1500,1000 kit. The meguiars sealer was like 5.00 at Walmart and the microfiber cloths I got at dollar store. Elbow grease was free. Results were priceless... I have done headlights, turn signals, and tail lights all with like new looks and still clear after about a year. Even had a scratch on my sunglasses and I used just the polish without the sandpaper of corse and it polished it right up... This stuff is great!
My tahoe has some really bad tail lights so I will clean them up and post before and after pics for you guys to see. Anyone can do it just do it exactly like what's above and you'll be fine.
Last edited: