foreverfalcon40
Full Access Member
What You Need:
1) BFH aka Big F'n Hammer
2) A few plastic bags from the reg supermarket or of that size, bigger the better. You get my drift.
3) Tire jack
4) Paint: You can buy the Caliper Paint, but I had extra Semi Gloss Black Hi Temp Paint (from when I was doing some engine painting on my DSM)
5) A piece of cardboard, spare wood, or even so me newspaper.
6) Break Cleaner
7) Wire Brush or a Wiz Wheel (I used both)
8) 12- Pack of Miller Light
9) Some Clear Coat (if you want that shiny look) I didn't use it but I will go back this summer and re-do them and finish them in a clear coat)
I had access to a lift a lift so I was able to jack up the Escahoe and remove all four wheels at once. I'll do it as if you only had a jack.
1) Drink a Beer
2) Start to un-tighten the lug nuts on two front wheels of the Hoe. BUT NOT ALL THE WAY OR TO MUCH!
3) Get the jack and raise up the HOE from the front so to the point that both front wheels are elevated off the ground.
4) Remove lug nuts and take off rim and tire. If it is hard to get the tire off, get your BFH and hit it from the inside. WATCH UR FACE! They say to hit the rim, but I have aftermarket rims, so I hit the tire, boyu does it have some kickback.
5) Drink a Beer
6) Now, get the brake Cleaner and start spraying the Caliper down, while you wire brush it. You do this to clean the caliper so paint has a firm surface to grab on and nOT flake off! When you think you've done enough whipe it down with a rag and spray some more brake cleaner on it. LET IT SOAK and repeat this whole process on the other wheel, while the other caliper is soaking in cleaner.
7) Go back to the other one and wire brush it again. You be the judge, if it looks clean , then let it dry out and repeat the process on the other caliper.
8) Drink a Beer
9)Once it is CLEAN AND DRY it is time BAG THE ROTOR. Get your bags from the local store and Cover your rotor, MAKE SURE YOU GO UNDERNEATH THE CALIPER! Make sure there are no holes or rips in the bag so there is no way in hell you over spray on your rotor.
10) Get you can and shake the life of out it. Till you feel the ball inside the can is freely moving inside the can. This means that the pain is mixed and ready to spray.
Now this is one of three coats. I did three, you can do more, or less. I though three is a good number plus. I've done three and its lasted for 4 months and has survived my brutal power washes as well as local car wash.
11) Painting the Caliper. DO NOT GET TO CLOSE to the CALIPER. You will smudge paint which will F-up the look and now your wasting paint as well.
I guess like 4-5 inches away. Just pick a motion, either up and down or side by side, never mix it up. If there are those nooks and crannies just switch it up and get a little close. Try not to be over generous with each coat. It will run off due to Gravity. If it starts to run don't fret, dab it out with the rag.
12) NOW LET IT DRY AND DRINK A BEER
13) Go to the other Caliper and make sure it is dry and clean and repeat the process of painting like you did on the other caliper.
14) Now your other Caliper should be dry by now, just double check to see if its dry and IF YOU MISSED ANY SPOTS! Give it another coat. Repeat this process till your happy in your pants.
15) Drink a Beer
16)(OPTIONAL) IF YOU HAVE CLEAR COAT MAKE SURE THE PAINT IS DRY AND APPLY THE CLEAR COAT AS YOU DID THE PAINT. IF YOU WANT MORE OF A SHINIER LOOK. THEN YOU MUST APPLY MORE COATS OF CLEAR AND THEN BUFF IT OUT TILL YOUR SATISFIED WITH THE SHINE.
17) Once its all said and done, put the tires back on, tighten the lug nuts. Drop the Hoe and go over the nuts make sure there really tight.
18) Drink a Beer
19) Onto the back. Jack up the hoe so that both back wheels are elevated off the ground and remove the rims and tires.
20) GET YOUR BFH again and start to hit the brake drum since its mos likely bound axle. Then remove it. it also a good time to check your shoes to see how much life you have left.
21) Now soak the drum in brake cleaner and commence the wire brushing. Clean it as you did the calipers.
22) Drink a Beer
23) Apply the Caliper Cleaning Process to the Rotors.
24)Now get your newspaper block of wood or what ever you have to prevent you spraying paint on your driveway (Momma or the Wifey won't be happy if the get a black spot on the drive way). Place the rotor on top of it...DUHHH
I chose to elevate my drum off the ground via cardboard box. Its easier to paint that way since there are those nooks and crannies that are needed to get to .
25)Remember to let each coat dry. Same with clear, if you are clearing them too. Slip the drum back and install wheels.
26)Drink a Beer
27) Go for a cruise if your sober enough and just pat yourself on the back and continue on with your day.
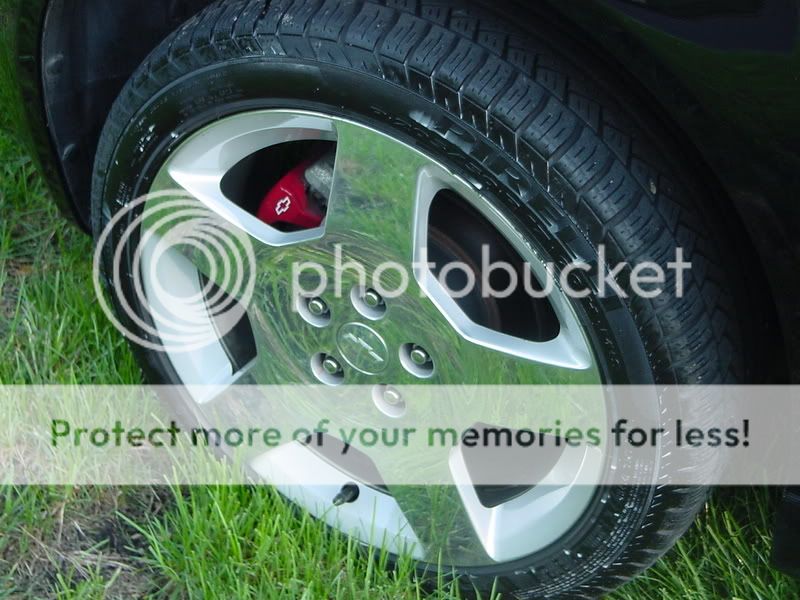
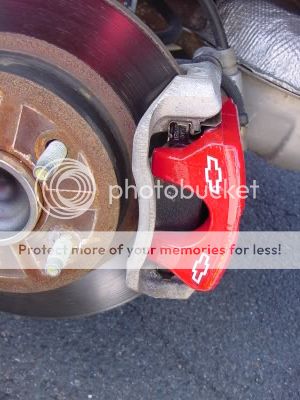
I WILL POST pics of the finished product when I get a chance. Feel free to ask questions.
1) BFH aka Big F'n Hammer
2) A few plastic bags from the reg supermarket or of that size, bigger the better. You get my drift.
3) Tire jack
4) Paint: You can buy the Caliper Paint, but I had extra Semi Gloss Black Hi Temp Paint (from when I was doing some engine painting on my DSM)
5) A piece of cardboard, spare wood, or even so me newspaper.
6) Break Cleaner
7) Wire Brush or a Wiz Wheel (I used both)
8) 12- Pack of Miller Light
9) Some Clear Coat (if you want that shiny look) I didn't use it but I will go back this summer and re-do them and finish them in a clear coat)
I had access to a lift a lift so I was able to jack up the Escahoe and remove all four wheels at once. I'll do it as if you only had a jack.
1) Drink a Beer
2) Start to un-tighten the lug nuts on two front wheels of the Hoe. BUT NOT ALL THE WAY OR TO MUCH!
3) Get the jack and raise up the HOE from the front so to the point that both front wheels are elevated off the ground.
4) Remove lug nuts and take off rim and tire. If it is hard to get the tire off, get your BFH and hit it from the inside. WATCH UR FACE! They say to hit the rim, but I have aftermarket rims, so I hit the tire, boyu does it have some kickback.
5) Drink a Beer
6) Now, get the brake Cleaner and start spraying the Caliper down, while you wire brush it. You do this to clean the caliper so paint has a firm surface to grab on and nOT flake off! When you think you've done enough whipe it down with a rag and spray some more brake cleaner on it. LET IT SOAK and repeat this whole process on the other wheel, while the other caliper is soaking in cleaner.
7) Go back to the other one and wire brush it again. You be the judge, if it looks clean , then let it dry out and repeat the process on the other caliper.
8) Drink a Beer
9)Once it is CLEAN AND DRY it is time BAG THE ROTOR. Get your bags from the local store and Cover your rotor, MAKE SURE YOU GO UNDERNEATH THE CALIPER! Make sure there are no holes or rips in the bag so there is no way in hell you over spray on your rotor.
10) Get you can and shake the life of out it. Till you feel the ball inside the can is freely moving inside the can. This means that the pain is mixed and ready to spray.
Now this is one of three coats. I did three, you can do more, or less. I though three is a good number plus. I've done three and its lasted for 4 months and has survived my brutal power washes as well as local car wash.
11) Painting the Caliper. DO NOT GET TO CLOSE to the CALIPER. You will smudge paint which will F-up the look and now your wasting paint as well.
I guess like 4-5 inches away. Just pick a motion, either up and down or side by side, never mix it up. If there are those nooks and crannies just switch it up and get a little close. Try not to be over generous with each coat. It will run off due to Gravity. If it starts to run don't fret, dab it out with the rag.
12) NOW LET IT DRY AND DRINK A BEER
13) Go to the other Caliper and make sure it is dry and clean and repeat the process of painting like you did on the other caliper.
14) Now your other Caliper should be dry by now, just double check to see if its dry and IF YOU MISSED ANY SPOTS! Give it another coat. Repeat this process till your happy in your pants.
15) Drink a Beer
16)(OPTIONAL) IF YOU HAVE CLEAR COAT MAKE SURE THE PAINT IS DRY AND APPLY THE CLEAR COAT AS YOU DID THE PAINT. IF YOU WANT MORE OF A SHINIER LOOK. THEN YOU MUST APPLY MORE COATS OF CLEAR AND THEN BUFF IT OUT TILL YOUR SATISFIED WITH THE SHINE.
17) Once its all said and done, put the tires back on, tighten the lug nuts. Drop the Hoe and go over the nuts make sure there really tight.
18) Drink a Beer
19) Onto the back. Jack up the hoe so that both back wheels are elevated off the ground and remove the rims and tires.
20) GET YOUR BFH again and start to hit the brake drum since its mos likely bound axle. Then remove it. it also a good time to check your shoes to see how much life you have left.
21) Now soak the drum in brake cleaner and commence the wire brushing. Clean it as you did the calipers.
22) Drink a Beer
23) Apply the Caliper Cleaning Process to the Rotors.
24)Now get your newspaper block of wood or what ever you have to prevent you spraying paint on your driveway (Momma or the Wifey won't be happy if the get a black spot on the drive way). Place the rotor on top of it...DUHHH
I chose to elevate my drum off the ground via cardboard box. Its easier to paint that way since there are those nooks and crannies that are needed to get to .
25)Remember to let each coat dry. Same with clear, if you are clearing them too. Slip the drum back and install wheels.
26)Drink a Beer
27) Go for a cruise if your sober enough and just pat yourself on the back and continue on with your day.
I WILL POST pics of the finished product when I get a chance. Feel free to ask questions.