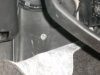
I kinda cheated on taking off the door panel off completely and just undo only one side of the inner door (the side next to the mirror) and pull it out just enough to get to the back. Detach both ends of the rubber boot in the door jam (Just a note on what NOT to do on the boot! Don’t pull the rubber boot off of the plastic ring that snaps in the door jam! It took me several refreshing beverages to get through that mess! All you have to do is take a screwdriver and slide it under the boot as in the pic and there is a tab on the side of the plastic ring you just push in the ring and pull the ring out.

Feed a clothes hanger wire through the hole you took the boot off up through and feed a clothes hanger wire through the door where the existing wire goes down the door and tape one of the ends of the camera wire good and carefully pull through. Be patient pulling it through, mine got snagged a couple times on something and had to gently just jiggle the wire til it comes free. You don’t want to be pulling hard on the wires. Undo the wire from the clothes hanger and run the clothes wire through the entire rubber boot starting at the end where it goes inside the Tahoe and comes out the other side. Attach the camera wire to the end of the clothes hanger and pull through the boot. This is also a tight fit but just keep working it and it will come though. Now all that’s left is push the camera wires through the hole going in the interior and snap the boot back on!
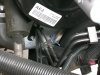
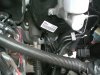
You now feed your wires under the dash til you get to the Lockpick module and hook up all the cables and wires according to their instructions. I found that if you install the Lockpick on the side of the console you have easier access getting to it if you have to. Plus you have much more room over there also! Because I did install a front camera also, the Lockpicks instructions say you must install a relay in order for the front and rear camera to play nicely together in the sandbox. I just went to a Auto parts house and got just a normal 4 prong 12v auto relay and followed the wiring procedures. I also put the relay on the side with the Lockpick since there’s lots of room. Oh! One more little tidbit before I leave you is if you intend to install a front camera (which I recommend, its really cool!) I drilled a hole thru my license plate and the bumper and ran the wires along the side of the engine compartment and then drilled a hole thru the firewall to feed the wires.


Note: When feeding the wire thru the console, its easier to run it in front of the console and then pull it thru to the back.

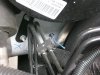
In the instructions there is a pink wire that is in the existing wiring harness when you have the NAV all pulled out and installing the Lockpick harness that you must cut and splice 2 wires that go to the relay. Do that before you reinstall the NAV back in the console! Just splice 2 long wires to each half of the cut pink wire and run them down to where the relay is before you stick the NAV unit back in.
Now if this install seems like too much trouble, its really not. And the results will be well worth it. Just take your time, if you get frustrated, walk away for a bit, watch some football, you know about the refreshing beverages of course, and go back to it. I’m not saying the way I did the install is the best way or the fastest way, but it is “a way!” It works, I’m happy, Mama is happy now that I’m out cutting the yard, and you will be also! If anyone has a better way of doing it other than the way I did, Please feel free to add to this Thread! That’s what the forum is for!. Have fun!!
P.S I’m serious about sending the wife away..;-)
Since the movie clips are too big to include on this Thread, if anyone is interested in seeing my cameras in action, I have some clips I made I can email you. My email is [email protected]
Feed a clothes hanger wire through the hole you took the boot off up through and feed a clothes hanger wire through the door where the existing wire goes down the door and tape one of the ends of the camera wire good and carefully pull through. Be patient pulling it through, mine got snagged a couple times on something and had to gently just jiggle the wire til it comes free. You don’t want to be pulling hard on the wires. Undo the wire from the clothes hanger and run the clothes wire through the entire rubber boot starting at the end where it goes inside the Tahoe and comes out the other side. Attach the camera wire to the end of the clothes hanger and pull through the boot. This is also a tight fit but just keep working it and it will come though. Now all that’s left is push the camera wires through the hole going in the interior and snap the boot back on!
You now feed your wires under the dash til you get to the Lockpick module and hook up all the cables and wires according to their instructions. I found that if you install the Lockpick on the side of the console you have easier access getting to it if you have to. Plus you have much more room over there also! Because I did install a front camera also, the Lockpicks instructions say you must install a relay in order for the front and rear camera to play nicely together in the sandbox. I just went to a Auto parts house and got just a normal 4 prong 12v auto relay and followed the wiring procedures. I also put the relay on the side with the Lockpick since there’s lots of room. Oh! One more little tidbit before I leave you is if you intend to install a front camera (which I recommend, its really cool!) I drilled a hole thru my license plate and the bumper and ran the wires along the side of the engine compartment and then drilled a hole thru the firewall to feed the wires.
Note: When feeding the wire thru the console, its easier to run it in front of the console and then pull it thru to the back.
In the instructions there is a pink wire that is in the existing wiring harness when you have the NAV all pulled out and installing the Lockpick harness that you must cut and splice 2 wires that go to the relay. Do that before you reinstall the NAV back in the console! Just splice 2 long wires to each half of the cut pink wire and run them down to where the relay is before you stick the NAV unit back in.
Now if this install seems like too much trouble, its really not. And the results will be well worth it. Just take your time, if you get frustrated, walk away for a bit, watch some football, you know about the refreshing beverages of course, and go back to it. I’m not saying the way I did the install is the best way or the fastest way, but it is “a way!” It works, I’m happy, Mama is happy now that I’m out cutting the yard, and you will be also! If anyone has a better way of doing it other than the way I did, Please feel free to add to this Thread! That’s what the forum is for!. Have fun!!
P.S I’m serious about sending the wife away..;-)
Since the movie clips are too big to include on this Thread, if anyone is interested in seeing my cameras in action, I have some clips I made I can email you. My email is [email protected]
Last edited:
") Ill get those pics out this weekend
Ill get those pics out this weekend