So I have owned a 2006 Chevy Tahoe since December of last year. I really love the truck, but the cheap plastic door lock for the rear lift gate is of the, shall we say, cheap crap... I'm putting it nicely. GM really dropped the ball on the robustness of the design with the plastic gears. I am now on the third lock. Every time it fails and the gears strip, it seems to happen in the locked position. Giving it some thought, I realized that there is NO way to get out of the vehicle if the battery dies or something happens that the side doors do not unlock. All of the previous SUV's that I have owned had a manual unlock button somewhere on the rear lift gate panel. This Tahoe... NOPE!!!
Sooo........ After installing the third plastic crappy lock, I decided to add a manual cable pull. It isn't pretty, but I'm not too worried about the looks. It WORKS and that is all I am concerned about. So, here is how I did it: :superhack:
1. Find The Materials:
A: I found an old bicycle and removed the brake pull cable. It has the long round lead stopper on it.
B: Find some type of T-Pull handle. You can find one in any junk yard from the trunk lid of a passenger car. I got one from a Jaguar. It gloes and looks pretty good.
[URL=http://s1383.photobucket.com/user/newtek0071/media/4_zpssk5ehjhr.jpg.html] [/URL]
C: A drill, and a 1/16" cable clamp. I got mine from Northern Tools in the cable and rope isle.
2. Install the cable and clamp.
[URL=http://s1383.photobucket.com/user/newtek0071/media/1_zps3zfatuat.jpg.html] [/URL]
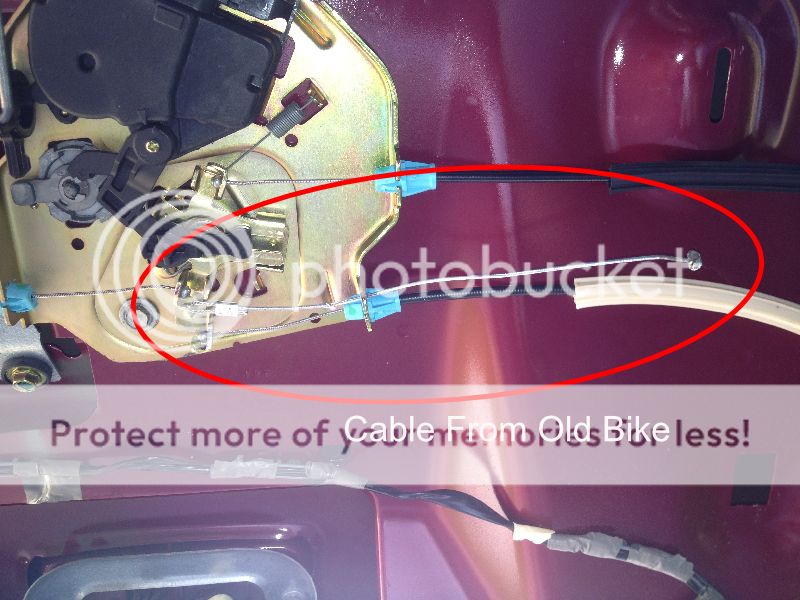
A: The cable that I have is 1/16". I drilled a hole big enough in the areas where the red arrows are. I threaded the cable through the holes and clamped the ends with the cable clamp shown in the circle.
B: When drilling the hole at the left side arrow, make sure it is on the top-most bracket. This is the part of the lock that needs to be pulled in order to open the lift-gate from inside.
C: Cut out a slot or something on the plastic trim piece to allow the cable and handle to be placed on the panel. You will have to figure out what to do here, as each handle and its attaching mechanism are going to be different.
[URL=http://s1383.photobucket.com/user/newtek0071/media/3_zpsbrenmffk.jpg.html] [/URL]
[URL=http://s1383.photobucket.com/user/newtek0071/media/2_zps4pn6klgp.jpg.html] [/URL]
Here is a picture of the lock and the cable that I found. I did have to grind the diameter of the head down in order to fit in the groove on the T-Handle that I found.
This tutorial is not meant to be a step-by-step instruction manual, but more of a general guideline. I am not going to detail how to remove trim panels and so-forth. But, I hope someone finds this info helpful.
To make the handle work, you pull on the T-Handle to the right, hold it, and push the lift gate open. That's it.
Enjoy.:naughty:
Sooo........ After installing the third plastic crappy lock, I decided to add a manual cable pull. It isn't pretty, but I'm not too worried about the looks. It WORKS and that is all I am concerned about. So, here is how I did it: :superhack:
1. Find The Materials:
A: I found an old bicycle and removed the brake pull cable. It has the long round lead stopper on it.
B: Find some type of T-Pull handle. You can find one in any junk yard from the trunk lid of a passenger car. I got one from a Jaguar. It gloes and looks pretty good.
[URL=http://s1383.photobucket.com/user/newtek0071/media/4_zpssk5ehjhr.jpg.html]
 [/URL]
C: A drill, and a 1/16" cable clamp. I got mine from Northern Tools in the cable and rope isle.
2. Install the cable and clamp.
[URL=http://s1383.photobucket.com/user/newtek0071/media/1_zps3zfatuat.jpg.html]
 [/URL]
A: The cable that I have is 1/16". I drilled a hole big enough in the areas where the red arrows are. I threaded the cable through the holes and clamped the ends with the cable clamp shown in the circle.
B: When drilling the hole at the left side arrow, make sure it is on the top-most bracket. This is the part of the lock that needs to be pulled in order to open the lift-gate from inside.
C: Cut out a slot or something on the plastic trim piece to allow the cable and handle to be placed on the panel. You will have to figure out what to do here, as each handle and its attaching mechanism are going to be different.
[URL=http://s1383.photobucket.com/user/newtek0071/media/3_zpsbrenmffk.jpg.html]
 [/URL]
[URL=http://s1383.photobucket.com/user/newtek0071/media/2_zps4pn6klgp.jpg.html]
 [/URL]
Here is a picture of the lock and the cable that I found. I did have to grind the diameter of the head down in order to fit in the groove on the T-Handle that I found.
This tutorial is not meant to be a step-by-step instruction manual, but more of a general guideline. I am not going to detail how to remove trim panels and so-forth. But, I hope someone finds this info helpful.
To make the handle work, you pull on the T-Handle to the right, hold it, and push the lift gate open. That's it.
Enjoy.:naughty:
