
JKmotorsports
tahoeyukonforum.com
Well, installed a second battery this weekend, so here is the write up for the installation. Only thing is, some of you may be disappointed, as my wife had the camera when she was out, so I was unable to take pics during the installation. But i did manage to snap some after shots when she she returned home.
I'm using the aux battery to help power the high current stuff such as my 3000 watt power inverter, 5000 watt mono amp, etc. Right now I'm using the same cca/rc rating battery I had laying around and will be upgrading to Optimas later.
Parts
1. You will need a way to mount the new battery. Probably the easiest way to do this is to get a stock replacement battery tray with the retainer and retainer bolt.
2. Battery Isolator/relay. This will prevent the main battery from draining while the engine is off and your accessories are running off your aux battery. Note: If the key is in the acc position, the stock electrical system will continue to run off the main battery. Also, in the ign position, the isolator contacts are closed and power will be drawn from both batteries. In this instance, you will get power from both batteries, theoretically doubling reserve capacity.
3. Cables to connect the main battery to aux batt. I used about 12 ft of 4 gauge to run from positive to positive and two feet for ground.
4. About 14ft. of 18-22 ga. wire to activate the isolator. The isolator needs to be connected to a source that will turn the relay on while the eng is running so both batteries will charge.
5. Sidepost battery extender terminals(3), found at most car audio shops.
6. 4 ga. ring terminals, (6)
7. 18-22 ga. ring terminals, (3)
Tools
You will need an assortment of sockets, cordless drill/screwdriver with #2 phillips bit, asst of open end wrenches, digital multimeter, solder and soldering torch (or small hand-held propane torch if available).
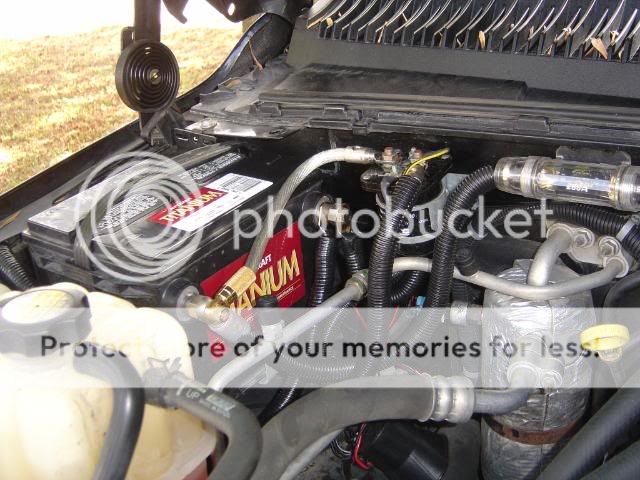
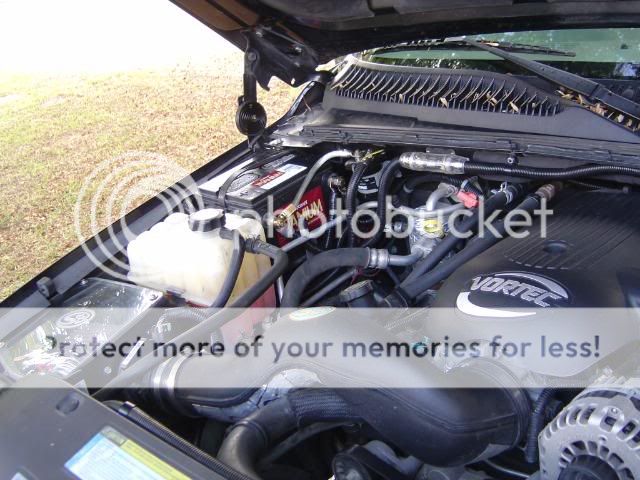
Here are some pics to show the location of the battery and isolator, cables, etc.
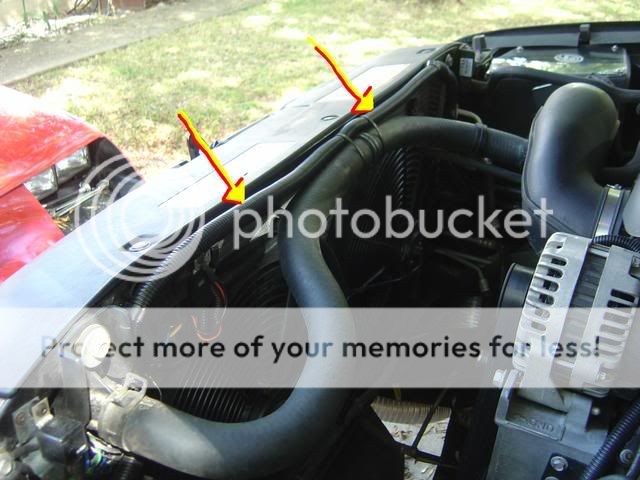
Here is the cable routed in the front:
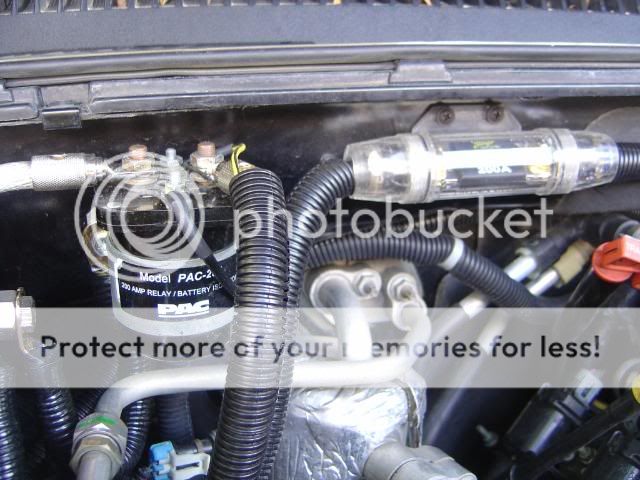
Battery Isolator and fuse/fuseholder

1). First, you will need to remove the fender to cowl brace on the passenger side near the hood hinge. There are four bolts; two attached to the cowl and the other two on the fender.
2). Mount the new battery tray in the area below the brace, on top of the fender well. There are no mounting holes, so you will need to screw the tray down with some self-tapping screws. Or you can remove the front wheel to drill new holes and use nuts/bolts to attach the new tray.
Set the new battery in the tray and secure.
3). Find a suitable place for the battery isolator. I mounted mine on the firewall, right above and to the left of the a/c accumulator. Be sure placement does not get in the way of the new battery. You can attach this with some self-tapping screws and your cordless driver:
4). Now, you will need to prepare the new cables. Cut about 1 1/2 feet off the 12 ft cable. You should now have about 10.5 ft of cable, one 1.5 ft section, and about two ft for ground. Attach each end of each cable with the 4 ga ring terminals. I soldered all my ring terminals using a propane torch and solder, then used heat shrink to insulate the connections. I used a propane torch because it heats the larger terminals and cable much faster for the solder to flow better. You will also need to attach a smaller ring terminal to one end of the smaller ga. wire used to activate the isolator. Next, cut off about 2 ft or so from one end of this wire. Attach the other two smaller ring terminals to each end of this shorter wire.
5). Attach the shorter section of 4 ga wire onto one terminal of the battery isolator. Follow the instructions that came with your battery isolator as to which terminals are which. They should all be the same, with two large posts and two smaller posts. The cable will attach to one of the larger posts (either one). Next, attach the other end of the cable to the positive terminal of the new battery using one of the sidepost battery terminals. You can also attach any cable you may have for your accessories (amp, etc) now.
6). Attach the longer run of 4ga cable to the other large post on the isolator. Also, attach the smaller 18-22ga wire on one of the smaller posts of the isolator (again, either post). Route this wire along with the cable down the passenger side, across the front over the fan shroud, and to the main battery. If you have split loom available, slip the loom over the cable and wire before routing. Be sure to route the wire as neatly as possible and as not to interfere with the airbox removal or any other part. Secure the cabling with wire ties, cable mounts, etc. as neccesary.
7). Now connect the end of the 4ga cable to the positive terminal of the main battery. To do this, you will need to remove the stock terminal and replace it with one of the new extended terminals so that you can fit the new cable on. Secure and tighten the post.
8). You will need to use a test meter to find a 12V source that powers on with ign only. The end of the smaller gauge wire will attach to this source. I attached to an ignition wire coming from the fuse block harness. You can simply attach to an appropriate fuse in the box with a fuse tap, but the preferred method is to splice into an ign source wire and solder.
9). Now, connect the short length of the smaller gauge wire to the last small terminal post of the isolator. Leave the other end loose for now.
10). Connect one end of the ground to the negative terminal on the battery using one of the new sidepost terminals. Route this and the loose wire from the isolator to an existing bolt on the body (fender, firewall, etc.) and connect to ground. Option: I also used another length of cable from the battery ground to the frame to ensure lowest possible voltage loss from battery to chassis.
Go through and make sure the cables, battery, all connections, isolator, etc. are all secure. Test operation of the isolator by turning the ign key to the ignition position. You should hear the isolator click on and off when the key is turned from ign to off positions.
Option: I also upgraded the stock 8ga wire from the alt to main battery with a new 4 ga wire, and added a beefier ground cable to the main battery.
I hope this is informative. These are general guidelines, as wire gauge, parts, and placement may be different depending on specific application. And please feel free to chime in if it's obvious I missed anything (long post, so I might have gone off track somewhere. I've already edited 4Xs") )
)
I'm using the aux battery to help power the high current stuff such as my 3000 watt power inverter, 5000 watt mono amp, etc. Right now I'm using the same cca/rc rating battery I had laying around and will be upgrading to Optimas later.
Parts
1. You will need a way to mount the new battery. Probably the easiest way to do this is to get a stock replacement battery tray with the retainer and retainer bolt.
2. Battery Isolator/relay. This will prevent the main battery from draining while the engine is off and your accessories are running off your aux battery. Note: If the key is in the acc position, the stock electrical system will continue to run off the main battery. Also, in the ign position, the isolator contacts are closed and power will be drawn from both batteries. In this instance, you will get power from both batteries, theoretically doubling reserve capacity.
3. Cables to connect the main battery to aux batt. I used about 12 ft of 4 gauge to run from positive to positive and two feet for ground.
4. About 14ft. of 18-22 ga. wire to activate the isolator. The isolator needs to be connected to a source that will turn the relay on while the eng is running so both batteries will charge.
5. Sidepost battery extender terminals(3), found at most car audio shops.
6. 4 ga. ring terminals, (6)
7. 18-22 ga. ring terminals, (3)
Tools
You will need an assortment of sockets, cordless drill/screwdriver with #2 phillips bit, asst of open end wrenches, digital multimeter, solder and soldering torch (or small hand-held propane torch if available).
Here are some pics to show the location of the battery and isolator, cables, etc.
Here is the cable routed in the front:
Battery Isolator and fuse/fuseholder
1). First, you will need to remove the fender to cowl brace on the passenger side near the hood hinge. There are four bolts; two attached to the cowl and the other two on the fender.
2). Mount the new battery tray in the area below the brace, on top of the fender well. There are no mounting holes, so you will need to screw the tray down with some self-tapping screws. Or you can remove the front wheel to drill new holes and use nuts/bolts to attach the new tray.
Set the new battery in the tray and secure.
3). Find a suitable place for the battery isolator. I mounted mine on the firewall, right above and to the left of the a/c accumulator. Be sure placement does not get in the way of the new battery. You can attach this with some self-tapping screws and your cordless driver:
4). Now, you will need to prepare the new cables. Cut about 1 1/2 feet off the 12 ft cable. You should now have about 10.5 ft of cable, one 1.5 ft section, and about two ft for ground. Attach each end of each cable with the 4 ga ring terminals. I soldered all my ring terminals using a propane torch and solder, then used heat shrink to insulate the connections. I used a propane torch because it heats the larger terminals and cable much faster for the solder to flow better. You will also need to attach a smaller ring terminal to one end of the smaller ga. wire used to activate the isolator. Next, cut off about 2 ft or so from one end of this wire. Attach the other two smaller ring terminals to each end of this shorter wire.
5). Attach the shorter section of 4 ga wire onto one terminal of the battery isolator. Follow the instructions that came with your battery isolator as to which terminals are which. They should all be the same, with two large posts and two smaller posts. The cable will attach to one of the larger posts (either one). Next, attach the other end of the cable to the positive terminal of the new battery using one of the sidepost battery terminals. You can also attach any cable you may have for your accessories (amp, etc) now.
6). Attach the longer run of 4ga cable to the other large post on the isolator. Also, attach the smaller 18-22ga wire on one of the smaller posts of the isolator (again, either post). Route this wire along with the cable down the passenger side, across the front over the fan shroud, and to the main battery. If you have split loom available, slip the loom over the cable and wire before routing. Be sure to route the wire as neatly as possible and as not to interfere with the airbox removal or any other part. Secure the cabling with wire ties, cable mounts, etc. as neccesary.
7). Now connect the end of the 4ga cable to the positive terminal of the main battery. To do this, you will need to remove the stock terminal and replace it with one of the new extended terminals so that you can fit the new cable on. Secure and tighten the post.
8). You will need to use a test meter to find a 12V source that powers on with ign only. The end of the smaller gauge wire will attach to this source. I attached to an ignition wire coming from the fuse block harness. You can simply attach to an appropriate fuse in the box with a fuse tap, but the preferred method is to splice into an ign source wire and solder.
9). Now, connect the short length of the smaller gauge wire to the last small terminal post of the isolator. Leave the other end loose for now.
10). Connect one end of the ground to the negative terminal on the battery using one of the new sidepost terminals. Route this and the loose wire from the isolator to an existing bolt on the body (fender, firewall, etc.) and connect to ground. Option: I also used another length of cable from the battery ground to the frame to ensure lowest possible voltage loss from battery to chassis.
Go through and make sure the cables, battery, all connections, isolator, etc. are all secure. Test operation of the isolator by turning the ign key to the ignition position. You should hear the isolator click on and off when the key is turned from ign to off positions.
Option: I also upgraded the stock 8ga wire from the alt to main battery with a new 4 ga wire, and added a beefier ground cable to the main battery.
I hope this is informative. These are general guidelines, as wire gauge, parts, and placement may be different depending on specific application. And please feel free to chime in if it's obvious I missed anything (long post, so I might have gone off track somewhere. I've already edited 4Xs
)
Last edited:
