2007 - Replace Motor Mount (Passenger Side)

Disclaimer: Links on this page pointing to Amazon, eBay and other sites may include affiliate code. If you click them and make a purchase, we may earn a small commission.

thrasher

New Member
Joined
Nov 25, 2012
Messages
11
Reaction score
0
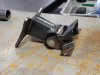
Motor mounts in 2007 LTZ 5.3L are bad (driver side broken, passenger side worn - according to dealer).

I successfully replaced the driver's side mount (there was a lot of clearance to work on that mount) and now working on the passenger side (there is way less clearance to work on this side).

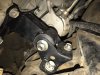
I can get all 7 of the bolts free on the passenger side mount - but am unsure how to extract the mount from its space (and position the replacement) since it is obstructed by the starter to the rear, AC compressor to the front and motor & frame to the sides along with some transmission cooling lines.

Can someone please provide technical info on removing the mount ? Does compressor have to come off ? Engine lifted ?

Thanks for your help !!!
 
Last edited:

Silverlx

New Member
Joined
Jul 23, 2012
Messages
9
Reaction score
0
I too have a broken driers side mount. I'm looking for a tutorial on how to do it, was it difficult to do yourself?
 

thrasher

New Member
Joined
Nov 25, 2012
Messages
11
Reaction score
0
Not too difficult if you have some experience working on cars & the tools & the time.

There's an attachment in a separate post in the `2007 Technical Write Ups & Installation Guides Forum' which describes the procedure, tools & parts that I used.

http://tahoeforum.com/showthread.php?t=527460

Good luck.
 
Last edited:

craigratliff

New Member
Joined
Jun 10, 2013
Messages
1
Reaction score
0
Location
Waco, TX
I've replaced the passenger side motor mount!!! :)

Finally got it done. I've posted a video on youtube with the how to. It is possible to replace the passenger side mount without removing the compressor. It's difficult but it was fun figuring out how to get it done.

Here's the video:
http://www.youtube.com/watch?v=uciDXqnFE10


If the link doesn't come through on the thread, just search for GMC motor mount replace on youtube and look for my name (craig ratliff)

Thanks for all who have posted on this site!! It has been a lifesaver time and time again.
 

thrasher

New Member
Joined
Nov 25, 2012
Messages
11
Reaction score
0
Hey Craig - awesome post & thanks for sharing.

Your solution with the hoist and heat shield removal really provide a lot of clearance to get that rascal out.

The passenger side replacement on my Tahoe is still pending - maybe one day or that 2nd engine mount that I have in the quiver goes on ebay.

---jjb
 

taylorsimoneaux

New Member
Joined
Jan 23, 2008
Messages
3
Reaction score
0
Update January 2016*** Changed 2007 Tahoe Driver side engine mount in my driveway.

Thanks to the above that posted the info. Gave me the confidence and instruction to go in and change mine myself. Wasn't bad at all. I did mine in the driveway with two bottle jacks that the Tahoe comes with. Just make sure the car is secure before getting under it and make sure you don't put the jack on the oil pan on the engine. Best advice I can give is to make damn sure you have a U-Joint Socket joint to make the weird angles you'll need to get to the bolts. Also, play with the number of socket extensions you need until you can get a good angle / free space for the ratchet to work. I used anywhere between almost 3 feet of extensions and 6". I easily reached all the mount to frame bolts from under the hood (Thats where the long extensions were used), after bending the heat shield on the mount out of the way a bit. The mount to engine bolts were a little more tricky but I got the two lowers from under the truck and the two uppers through the wheel well. I also had a ratchet with a swiveling head which helped to work in those tight places.

Just one of those things where its a 4-5 hour project the first time you do it. Probably a 2-3 Hour project the second time.
 

thrasher

New Member
Joined
Nov 25, 2012
Messages
11
Reaction score
0
Thanks for adding to the thread taylorsimoneaux - good info.

Three feet of of extensions - that's impressive !
 

viper59

New Member
Joined
Jan 17, 2016
Messages
1
Reaction score
0
Were do you put the bottle jack do you have a picture . Thanks Kevin
 

thrasher

New Member
Joined
Nov 25, 2012
Messages
11
Reaction score
0
There are tab(s) on the engine block that you can use to lift engine with the bottle jack. Search the web and you should be able to find a diagram that shows their location for reference.
 

ibtmp84

New Member
Joined
Jul 6, 2016
Messages
1
Reaction score
0
There are tab(s) on the engine block that you can use to lift engine with the bottle jack. Search the web and you should be able to find a diagram that shows their location for reference.

I have looked up and down and cant find a picture of these tabs you are references. Why does some that looks so easy have to be so hard.
 

Prerun1450

New Member
Joined
Oct 11, 2016
Messages
1
Reaction score
0
I was tired of replacing motor mounts from oreilly every 3 months so I built my own. Passenger side stock one was a pain to get out, but I was able to pull it out between the framerail and header with the engine lifted up as far as it would go....(I've got a forklift so it was easy for my to lift)
 

Attachments

  • 20161003_174634.jpg
    20161003_174634.jpg
    110.2 KB · Views: 14
  • FB_IMG_1476165164440.jpg
    FB_IMG_1476165164440.jpg
    82.5 KB · Views: 11

thrasher

New Member
Joined
Nov 25, 2012
Messages
11
Reaction score
0
Diagram with Tab Locations

Ok - sorry that you could not find a diagram - some that were available seem to have been removed.

Here is a diagram of the underside of the 5.3L engine. It's a little difficult to see or visualize, but the arrow points to the `flat' tab area that can be used for safely lifting the engine from below using the bottle jack. If you look closely, there's a sister tab directly opposite of the one pointed to by the arrow.

Good luck.
 

Attachments

  • 53L_Motor_Lift_Tab_Locations.jpg
    53L_Motor_Lift_Tab_Locations.jpg
    167.8 KB · Views: 26
Last edited:
Top