49er
New Member
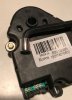
I just replaced the dreaded driver side blend door actuator on my 2004 Tahoe with Automatic A/C. This actuator is located on the top of the HVAC unit on the passenger side, just beneath the top of the dash board.
Access is horrible but possible with some work. Biggest obstacles are the wiring harnesses that need to be freed-up and massaged out of the way.
Here's the point of this post. I fabricated a special wrench for extracting the screws. It made the job possible, and on the verge of easy.
Photos attached.
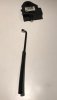
1. I bought a 1/4" drive DEEP socket set from Harbor Freight and used the 7/32 socket. I cut it off using a Harbor Freight angle grinder to produce a sleeve, round on the outside and 7/32 hex on the inside.
2. I bought an Allen Wrench set from Harbor Freight and the used the angle grinder to slice off some of the short leg of the 7/32 Allen Wrench. Then I used my Harbor Freight bench grinder to clean up the cut of the wrench and the cut end of the socket.
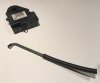
3. Next, I pushed them together to make the stubby socket wrench. Mine had enough burs to keep the socket from falling off, but you could glue together if needed. It's beautiful, but hard to use effectively without the next crucial step.
4. I added a short length of fuel line hose to give me something to grip easily and manipulate the wrench. This made all the difference! It's flexible and allows more range of motion than a rigid tool.
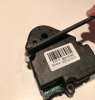
Using this, the seemingly impossible screws came out and went back in easily.
One more tip for dealing with screws on some of these things. Make a small cardboard nut to temporarily affix the screw to the part. (Like on a plug outlet or light switch) Then once the screw is started, remove the cardboard nut. I make the cardboard nut from the back of a paper pad. It's about 1" long, 1/4" wide with a starter hole near one end. To make it easily removed after it does its job, pre-slit the end near the hole nearly all the way through. One small tug and it's removed.
Good luck. Hope this helps!
P.S. I do not work for Harbor Freight!
Access is horrible but possible with some work. Biggest obstacles are the wiring harnesses that need to be freed-up and massaged out of the way.
Here's the point of this post. I fabricated a special wrench for extracting the screws. It made the job possible, and on the verge of easy.
Photos attached.
1. I bought a 1/4" drive DEEP socket set from Harbor Freight and used the 7/32 socket. I cut it off using a Harbor Freight angle grinder to produce a sleeve, round on the outside and 7/32 hex on the inside.
2. I bought an Allen Wrench set from Harbor Freight and the used the angle grinder to slice off some of the short leg of the 7/32 Allen Wrench. Then I used my Harbor Freight bench grinder to clean up the cut of the wrench and the cut end of the socket.
3. Next, I pushed them together to make the stubby socket wrench. Mine had enough burs to keep the socket from falling off, but you could glue together if needed. It's beautiful, but hard to use effectively without the next crucial step.
4. I added a short length of fuel line hose to give me something to grip easily and manipulate the wrench. This made all the difference! It's flexible and allows more range of motion than a rigid tool.
Using this, the seemingly impossible screws came out and went back in easily.
One more tip for dealing with screws on some of these things. Make a small cardboard nut to temporarily affix the screw to the part. (Like on a plug outlet or light switch) Then once the screw is started, remove the cardboard nut. I make the cardboard nut from the back of a paper pad. It's about 1" long, 1/4" wide with a starter hole near one end. To make it easily removed after it does its job, pre-slit the end near the hole nearly all the way through. One small tug and it's removed.
Good luck. Hope this helps!
P.S. I do not work for Harbor Freight!