Fuel Pump Access Panel; Picture heavy

Disclaimer: Links on this page pointing to Amazon, eBay and other sites may include affiliate code. If you click them and make a purchase, we may earn a small commission.

carter262

New Member
Joined
Oct 31, 2012
Messages
9
Reaction score
0
Hello everyone.

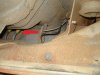
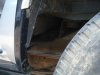
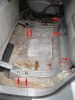
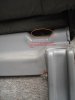
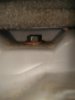
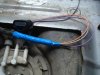
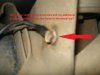
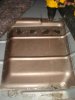
Well my fuel pump went out. From what I have read seems to be a common problem. The thought of having to drop the tank in my driveway with limited to no help was not very appealing. Plus the thought of having to pay $400 to $600, that was the quote I got, was even less appealing. So after much thought and reading I decided I needed an access panel. The truth is I decided that Chevy should of given me one to start with especially if they knew about the fuel pump issues. But that is just my opinion.

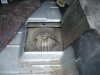
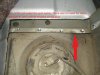
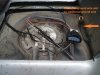
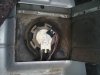
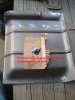
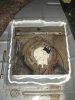
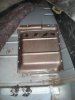
So here is my little project. Just to warn you this will be picture heavy, but a picture is worth a thousand words from what I hear.

PS: I have a 1997 Tahoe LT, 4 door, 4 wheel drive with 170,00 miles. It is new to me and appears to have been very mistreated before I got it.
 

carter262

New Member
Joined
Oct 31, 2012
Messages
9
Reaction score
0
Step One

First step was to locate where the fuel pump was under the rear floor pan.

This picture is looking into the rear drivers' side wheel well in front of the tire. The fuel lines helped to narrow it down.
 

Attachments

  • FuelpumpLocation.jpg
    FuelpumpLocation.jpg
    94.1 KB · Views: 345
  • DSC06424.jpg
    DSC06424.jpg
    84.7 KB · Views: 291

carter262

New Member
Joined
Oct 31, 2012
Messages
9
Reaction score
0
Step Two

Once I found the fuel pump's location the next step was to expose the rear floor pan under the back seat.

To remove the rear 70% seat there were 7 bolts. If memory serves me 3 are 15mm and 4 are T-45 torx bolts. 6 of the 7 are easy enough to get to, but the upper bolt closest to the door is a little more difficult. I had to use a crescent wrench because I couldn't get a socket on it.
 

Attachments

  • RearSeatBolts.jpg
    RearSeatBolts.jpg
    88.8 KB · Views: 297
  • SeatBolt.jpg
    SeatBolt.jpg
    69 KB · Views: 267
  • DSC06427.jpg
    DSC06427.jpg
    32.2 KB · Views: 237

carter262

New Member
Joined
Oct 31, 2012
Messages
9
Reaction score
0
Step Three

Once the seat is out remove the plastic trim in the door frame. I only had to remove the small middle one and was able to slide the carpet out from under the other trim on the B post and C post. Now you can fold the carpet out of the way to expose the floor pan.

The fuel pump is directly under the raised spot. This the where you will be cutting the access point.
 

Attachments

  • floorPan.jpg
    floorPan.jpg
    82.8 KB · Views: 393

carter262

New Member
Joined
Oct 31, 2012
Messages
9
Reaction score
0
Step Four

Now it is time to cut the access.
There are 4 spot welds on the raised portion of the floor pan. I cut on the other side, side closest to the center line of the car, I suggest you cut on the side closest to the door. This is where the black line is in the picture. The reason for this is there is as rail under the spot welds. If you cut where I did you have to drill them out with a 1/2" drill bit to remove the panel.

The other 3 cuts should be made close to the edge of the flat part of the raised portion of the floor pan. This will give you enough room to work.

To make the cuts I used a die cutter with a cut off wheel. I have read another article where a guy used a air nibbler. It seemed to work good with straight lines and less of a mess. I didn't have one and didn't want to spend any more money so I used what I had.

Keep in mind when you cut that the gas tank is approximately 1/2" or so below the floor pan. That is another reason the other guy used the Nibbler. Less of a chance of an accident.
 

Attachments

  • floorPan.jpg
    floorPan.jpg
    85.5 KB · Views: 427
  • DSC06429.jpg
    DSC06429.jpg
    97.1 KB · Views: 427
  • rail.jpg
    rail.jpg
    111.5 KB · Views: 429

carter262

New Member
Joined
Oct 31, 2012
Messages
9
Reaction score
0
Step Five

Replace the Fuel Pump and pigtail on the wiring harness. I did the pigtail first.

The new fuel pump should come with a new upgraded pigtail. I bought a Bosch fuel pump because it was in stock, has a life time warranty, and was not an Airtex (cheap one). The one I pulled out was an Airtex and was supposedly replaced about a year ago.

So back to the pigtail. The new pump should come with wiring directions. Mine was:
purple to purple
gray to gray
black to solid black
orange & black to black & white.
When splicing the wires I tried to stagger the butt connectors so that they would fit in the loom better when done. I also used dielectric grease in the butt connectors and covered the splices with heat shrink to protect them.

Just a side note: the solid black wire is the ground wire that goes to a bolt in the wheel well. I up graded mine. I ran an 8 gauge wire from the battery to the bolt that the solid black wire grounds to and attached both of the wires together. Nothing wrong with a little redundancy and overkill. Just my opinion.
 

Attachments

  • wires.jpg
    wires.jpg
    113.3 KB · Views: 356
  • DSC06433.jpg
    DSC06433.jpg
    100.4 KB · Views: 294
  • ground.jpg
    ground.jpg
    45.3 KB · Views: 310

carter262

New Member
Joined
Oct 31, 2012
Messages
9
Reaction score
0
Step Six

Replace the fuel pump.

Remove the 2 fuel lines from the pump. There is suppose to be a special tool to get the clamps in the end to release. I used a small flat head screwdriver and a lot of wiggling until I got all 4 of the clamps pieces to release. Also the right one spewed on me for a second. I guess it was under pressure.

There is a lock ring around the fuel pump holding it down. Use a flat head screwdriver and hammer to rotate it until it is free.

Now work that fuel pump out. It was a pain in the butt for me. It seems they would of made the hole a little bigger for easier removal, but start making it easy now.

Once the old one is out make sure you remove the old gasket too.

Put on the new gasket and install the new fuel pump. There is a notch in the gas tank opening where a tab on the fuel pump will fit into so that you know that the fuel pump is lined up correctly. Reinstall the ring the same way you removed it.

Next is the fuel lines. They should just pop back on.

Last plug in the pigtail. Here again I put some dielectric grease in the pigtail to protect the connections.
 

Attachments

  • DSC06435.jpg
    DSC06435.jpg
    84.8 KB · Views: 300

carter262

New Member
Joined
Oct 31, 2012
Messages
9
Reaction score
0
Step Seven

Now for the new access hole's new cover.

I went to my local U-Pull-It and cut out a panel larger than the hole I cut. This way I had plenty of lip which gave me more room to seal off the access hole. It would probably be a good idea to make this step one that way when the new pump is in you can go ahead and seal everything up, reinstall the seat and be done. I did not think it that far through. whoops, well live and learn.

The hard part here is having a tool to cut out the panel in the middle of a junk yard. I borrowed a DeWalt cordless rip saw with a metal cutting blade.

Here I recommend cutting one the other side of the welds for the cover. This will give you more of a lip to seal everything up. You will have to drill out the 4 spot welds though.

After I got the cover home I ran a strip of tape under the 4 holes and then filled them with JB Weld to seal them back off. Now good as new.

Next I placed the cover in place and marked around it. This is used for the guide so I know where I can run the silicon.

I predrilled 3 holes in the front and back and 2 on each side for the screws that would be used secure the cover to the floor pan.

I then removed the cover and ran a good size bead of outdoor silicon caulk around the hole.

Now, reinstall the cover and screw it down. Ta-da good as new, if not better than new because you have an access panel now!

The only thing left is to fold the carpet back, reinstall the door trim and seat.

Now you are done.

I hope you find this helpful. I think it turned out pretty good.

Good Luck :happy160:
 

Attachments

  • weldHoles.jpg
    weldHoles.jpg
    82.1 KB · Views: 293
  • DSC06440.jpg
    DSC06440.jpg
    75.7 KB · Views: 268
  • DSC06441.jpg
    DSC06441.jpg
    102.6 KB · Views: 264
  • DSC06442.jpg
    DSC06442.jpg
    96.9 KB · Views: 285

gdk771

New Member
Joined
Dec 7, 2012
Messages
7
Reaction score
0
Thats pretty neat..

How easy is it to get the panel off if you ever have to get it out again? Also, how did you know you would not grind into the fuel tank with the cutoff wheel? I see images of a fireball ;)
 

carter262

New Member
Joined
Oct 31, 2012
Messages
9
Reaction score
0
Getting the panel off if you ever had to change out the fuel pump again would be pretty easy. Remove the screws and use a flat head to pry the panel up breaking the silicon loose.

As for the cutting I went slow and was very careful to only let the blade down about a 1/4" max. The access panel cover I used to cover the hole with I cut out a Tahoe in a salvage yard so the gas tank was not an issue at that point. They had removed it.

If you are not comfortable cutting the hole with a die cutter with a cut off wheel I suggest you go to Harbor Freight and buy a cheap air nibbler. It should cut through without the worry of cutting the tank and seeing that fire ball.
 

niik

New Member
Joined
Dec 31, 2012
Messages
12
Reaction score
0
Nice mod.

Wanted to do the same on mine when I realised that there was already a hole but without any cover.
You could see the bottom of trunk lining from underneath the car!

So much easier like this.
 

renebarragan

New Member
Joined
Jan 30, 2013
Messages
1
Reaction score
0
Location
San Jose, Ca
thank you this helped alot and saves me 600 dollars..

do you know anything about low pressure in the 2nd cylider.
i just bought a 98 tahoe i been wanting to get but when i took it to get checked out i was told there was lower pressure in the 2nd cylinder and told me its a 2000 $ job .
 

Bigbill

New Member
Joined
Aug 1, 2012
Messages
49
Reaction score
0
Location
Middletown CT
They must be talking about compression not fuel pressure if its low compression it depends where the compression is leaking rings,valves, on the cost of the repair sounds like 2000.00 is an engine rebuild but what are hey doing you can get a Jasper's engine for 2000.00 with a three year 100k warrantee
 

wil85iroc

New Member
Joined
Dec 7, 2013
Messages
5
Reaction score
0
good write up, my 1997 gmc Yukon gt broke down, not getting fuel, I checked relay, etc but its starving... im gonna try this next week..
 

wil85iroc

New Member
Joined
Dec 7, 2013
Messages
5
Reaction score
0
does anyone know if the 2 door model has the pump location under the seat or rear compartment near spare tire holder?
 

BigWheelinBubba

New Member
Joined
Jun 17, 2012
Messages
24
Reaction score
1
Location
Troy, MI
What I'm having a hard time comprehending is why if you're so mechanically inclined to take the seat out and cut the hole in the floor pan but you can't raise the truck, unbolt a couple gas tank straps and do it the right way? Not that difficult..
 

wil85iroc

New Member
Joined
Dec 7, 2013
Messages
5
Reaction score
0
how easy is it really to drop the tank with hand tools to change pump?? I ask because my fuel pump went and pepboys quoted me $475 to install a new pump but when I got there they didn't even want to touch it! they said my fuel lines are rusted and if they drop the tank it will break my lines and I would have to get news ones... I think they re lazy mechanics don't wanna wast time cuz its not a easy job.. before I took it there I tried everything, visually checked under truck, around wheel wells, suspension, tank, and fuel neck, I didn't see any fuel line connections. from the pics the lines go into the top of the tank to connect to pump.... if I carefully remove pump from in/out fuel line I should be ok right???
 

wil85iroc

New Member
Joined
Dec 7, 2013
Messages
5
Reaction score
0
if I do need fuel lines, who makes prebent factory replacements?? thnx again..
 

2000tahoez71

New Member
Joined
Feb 24, 2009
Messages
42
Reaction score
0
It's a pain but I did it with a floor jack on back in the drive way. That and the gas gauge said empty though I got tired of fighting the weight trying to get it out. Ended up pumping 9 gallons out of it. Buy the little Quick disconnect line removal tools and be careful not to crack the valve or whatever (pressure sensor) on the top of the tank. As for the lines, if I remember correctly they are steel that then meet up with a rubber line on the inside of the chassis rail. I would look at rock auto to get a part number and then search amazon, especially if you are a prime member.
 
Top