You say to locate the BCM. Ok, I'm new, what is the BCM? Next, what size/type of diode do you need to buy?
Thanks!!!
Steve
To all who are interested, in my '03 I found a MUCH easier way to do this. I think this should work for 2003 and newer models.
First, go to Radio Shack and buy any good 1-3 amp rectifier diode. Cost is about 3 bucks for a pair. The total length of these diodes are about 3 inches between the ends of the leads. That's long enough.
Go into the engine compartment and locate the fuse/relay box. In my '03, it's on the driver side. In there, locate the two headlight relays. There is one for high beam and one for low beam. Make note of the direction they are installed, and pull them out. You will see there are four holes that each relay plugs into, in a rectangular pattern.
The lights are switched when something (the dimmer switch or the BCM-- Don't know-- Don't care.) grounds the relay trigger. When you stand beside the truck on the driver's side, facing the fender, the trigger ground is the LOWER RIGHT hole of each relay socket.
Lay a diode between the LOWER RIGHT hole of the high beam relay socket and the LOWER RIGHT hole of the low beam relay socket. (If you know how to read the markings on a diode, you want current to flow from the low beam socket to the high beam socket.) Bend the leads so they will not short near any other holes. Bend the very ends of the leads to extend into the LOWER RIGHT holes of the relay sockets.
Don't try to push the leads down into the sockets. They won't go. All you're after is to get the ends of the leads where they will solidly contact the relay pins when you put the relays back in.
Put the relays back in their sockets. Be sure they are right-side up, and that the leads of the diode make good contact with the leads on the relays. The relay pins should pinch the diode leads against the plastic of the socket, making a solid connection.
Test the lights. If you get all four lamps when you switch to low beam, reverse the diode.
Pictures--
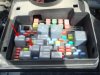
1. The fuse/relay box.
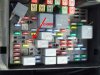
2. The headlamp relays (red arrows). High beam is the upper left, low beam is lower right.
3. How to lay the diode in place (red arrow). Note the gray bar on the diode is toward the high beam socket.
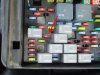
4. The final installation. Diode is marked by the red arrow.


")
")